How to enable developer mode on Android 4.0 and above
Developer mode on Android, which is often found on OS 4.0 and above, by enabling this feature means that users can access features that are more similar to US debugging. This feature is purposely hidden and in order to see all the menus from this developer mode you also have to use a very simple way, which is just click-click. This developer function is specially intended for users who think they are already familiar with Android. For example, you might want to try turning Android into a tool that can connect to other devices such as computers / laptops. Enabling USB debugging will allow all of the features of Android to be recognized on the computer.
Most people only display this developer mode to enable USB debugging, be it to make changes to the phone system, ROOT with software on a computer, or anything else that leads to Android phones. The best part about enabling USB debugging This means that the mobile phone can still be recognized even if the mobile phone is in a death or error state. For example boot loop, of course it’s only about the logo, but if you have activated USB debugging, you can operate it directly like a remote control, for example perform a factory reset, which is of course very easy.
But there is also Bad things about enabling USB debugging this is a virus. Any virus that suddenly enters must not be seen with the direct eye, and only antivirus can see and block it, but of course when it has entered and is not detected it becomes even more difficult. So it is best not to enable USB debugging forever and only when you want to modify a custom ROM or other operations (Change font, SystemUI, Framework-Res) which seems a little dangerous. That way, a bug on the phone can still be fixed by itself unless there is CWM (recovery), if it is a boot loop just restore it.
I myself was helped by activating USB debugging when my phone was not ROOT at that point and suddenly the boot loop was not clear even though the phone was not ROOT, it could be a system error. Then I try to connect it to the PC and go into recovery and as a result it can be properly recognized. Just do a factory reset and the phone will be like new again and won’t boot. So now you need to understand the pros and cons of enabling USB debugging, and before enabling there How to display the developer mode menuas the USB debugging function is available in the menu. Here is the procedure, see below.
First of all, open your Android phone and go to settings
If it’s already in Settings, please scroll down and find the menu Via phone
Then scroll down the About phone page until you meet the section Build number
Note that the build number text is not clickable, but it is actually. Please click 7 times or 10 times, it will be displayed that the developer mode is active.
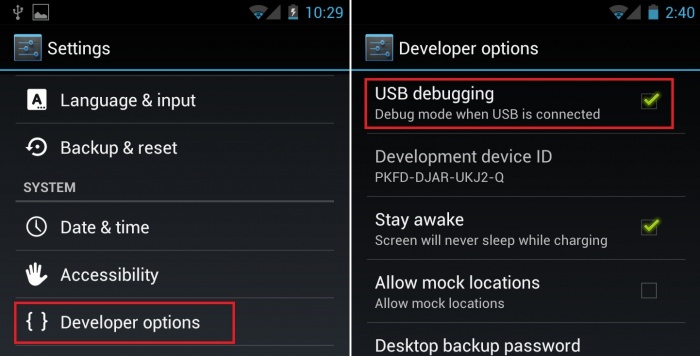
To switch to developer mode, please return to Settings and scroll down. There will be a new menu called. displayed Developer options
It’s easy, isn’t it? I remind you one more time This developer mode feature is only available on Android 4.0 and above, and for below, it may not be there, and features similar to USB debugging must already be in the Security or Privacy menu. The Developer Options menu will still exist and to get rid of it you can do a factory reset. It is better to be careful when setting in the menu, as this feature is specially intended for those who already understand the gist of the structure of Android. So I remind you not to be careless about setting them so that the phone is in a normal state. here I don’t want to scare users into enabling this feature as I enabled it myself. But just a suggestion, for the USB Debugging section, don’t enable it all the time, only enable it at certain times like my suggestion above. If you have anything to ask, please comment.
Hopefully useful and good luck